Python coding
Read pointer-type dials on an analogue gauge with OpenCV
last updated: 2020-12-06
Quick links
- Intro
- Installing python 3 and the needed modules
- Opencv methods
- The python code
- Downloads
- Interesting links:
Intro
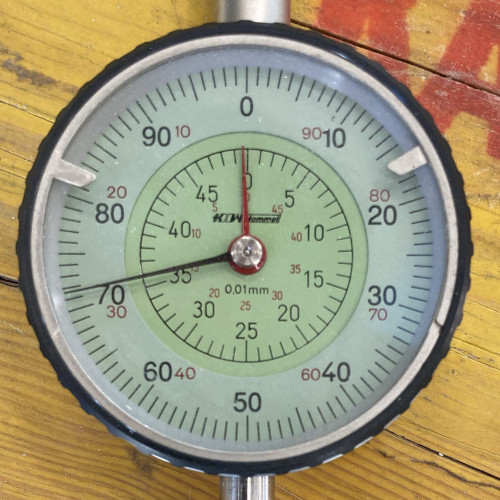
We get the following picture and try to read the two pointers with python 3 and opencv.

Being a newbie with opencv a good starting point and help for this code was the page of Nayak Abhijeet.
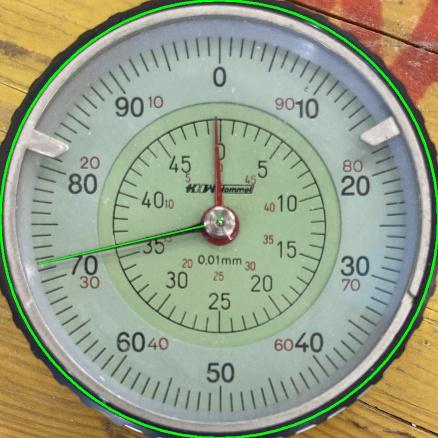
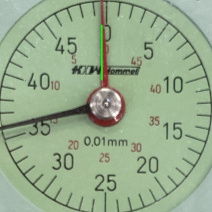
Here we see the result of our program:


gauge_p2.jpg We are reading: 497.1153 µm
Installing python 3 and the needed modules
On Linux python3 is already installed. We need the following modules (libraries):
#!/usr/bin/python3
# -*- coding: utf-8 -*-

import os
import glob
import cv2 as cv      # to run the code even if version changes
import numpy as np
import pandas as pd
...
osis needed for operating system dependent functionality like change directory ('os.chdir(DIRNAMEIMAGES)')glob2finds all the pathnames matching a specified pattern and is used to get all files from an image directory.cv2is the opencv module to manipulate image data.numpy(NumPy) is the fundamental package for scientific computing in Python. It provides a multidimensional array object, and an assortment of routines for fast operations on arrays. Our images are such arrays.NumPy()Pandas) provides a fast and efficient DataFrame object for data manipulation with integrated indexing. Pandas is top to work with spreadsheet data. We use pandas e.g. to create a.csv-file with the data.
On Linux use e.g sudo apt install python3-opencv to install the libraries, or use pip:
    pip3 install opencv-python
    pip3 install pandas
We use Python version 3. On Linux use always python3 (not python or python2) to call python, also use pip3 instead of pip.
python3 read_analogue_gauge.py
To work on the program you can use Idle, Python’s Integrated Development Environment, but we prefer the Thonny IDE.
To run the program you need to adapt the directory path for the image files:
...
DIR_NAME_IMAGES = '/mydocs/read_dial_gauge/images'
...
for Windows user:
If you can't change to Linux and are forced to use Windows :)).
Download python on python.org and install the .exe file. On the first screen check "Add Python to PATH". This enables you to use python everywhere.
Open command prompt (Start and type cmd) and use the following commands to install the missing modules:
    pip install opencv-python
    pip install pandas
To work on the program you can use IDLE, Python’s Integrated Development Environment, that was already installed with the .exe-file. We prefer the Thonny IDE, that also exists for Windows.
In Windows we need to adapt the directory path. The backslash needs to get doubled, like this:
...
DIR_NAME_IMAGES = 'C:\\mydocs\\read_dial_gauge\\images'
...
If further help for python on Windows is needed click here: Using Python on Windows.
Opencv methods
An overview on OpenCV methods can be found on my OpenCV basics page:
http://weigu.lu/other_projects/python_coding/opencv_basics/index.html
That is a good starting point to understand the following code.
The python code
    #!/usr/bin/python3
    # -*- coding: utf-8 -*-

    """ Read pointer-type dials on an analogue gauge """
    ###############################################################################
    #
    #  Name:         read_analogue_gauge.py
    #  Purpose:      read pointer-type dials on an analogue gauge
    #  Author:       weigu.lu
    #  Date:         2020-12-06
    #  Version       1.1
    #
    #  Copyright 2020 weigu <weigu@weigu.lu>
    #
    #  This program is free software; you can redistribute it and/or modify
    #  it under the terms of the GNU General Public License as published by
    #  the Free Software Foundation; either version 2 of the License, or
    #  (at your option) any later version.
    #
    #  This program is distributed in the hope that it will be useful,
    #  but WITHOUT ANY WARRANTY; without even the implied warranty of
    #  MERCHANTABILITY or FITNESS FOR A PARTICULAR PURPOSE.  See the
    #  GNU General Public License for more details.
    #
    #  You should have received a copy of the GNU General Public License
    #  along with this program; if not, write to the Free Software
    #  Foundation, Inc., 51 Franklin Street, Fifth Floor, Boston,
    #  MA 02110-1301, USA.
    #
    #  source:
    #  https://medium.com/@nayak.abhijeet1/
    #  analogue-gauge-reader-using-computer-vision-62fbd6ec84cc
    #
    #  More infos on weigu.lu/other_projects
    #
    ###############################################################################

    import os
    import glob
    import cv2 as cv                        # to run code even if version changes
    import numpy as np
    import pandas as pd

    DIR_NAME_IMAGES = '/savit/programming/python/read_dial_gauge/images'
    MAX_PIXEL = 1000                        # reduce picture to this size for quicker calculations

    DEBUG = 0

    MIN_RADIUS_RATIO_1 = 0.8                # Where to look for the first circle
    MAX_RADIUS_RATIO_1 = 0.95
    MIN_RADIUS_RATIO_2 = 0.85               # Where to look for the second circle
    MAX_RADIUS_RATIO_2 = 0.98

    L1_P1_LOW = 0                           # boundary how close the line (P1) should be from the center
    L1_P1_UP = 0.3
    L1_P2_LOW = 0.7                         # how close P2 should be to the outside of the gauge
    L1_P2_UP = 0.9

    L2_P1_LOW = 0                           # boundary how close the line (P1) should be from the center
    L2_P1_UP = 0.3
    L2_P2_LOW = 0.8                         # how close P2 should be to the outside of the gauge
    L2_P2_UP = 0.995

    ### the functions ###

    def avg_circles(pcircles, pb):
        '''averaging out nearby circles'''
        avg_x = 0
        avg_y = 0
        avg_r = 0
        for i in range(pb):                 # optional: av. multiple circles (gauge at a slight angle)
            avg_x = avg_x + pcircles[0][i][0]
            avg_y = avg_y + pcircles[0][i][1]
            avg_r = avg_r + pcircles[0][i][2]
        avg_x = int(avg_x/(pb))
        avg_y = int(avg_y/(pb))
        avg_r = int(avg_r/(pb))
        return avg_x, avg_y, avg_r

    def dist_2_pts(px1, py1, px2, py2):
        '''pythagore'''
        return np.sqrt((px2 - px1)**2 + (py2 - py1)**2)

    def show_image(pimg, show_flag_time):
        ''' Show image during x ms if flag is set. Parameter show_flag_time is a
            tuple e.g (1,2000) to show picture for 2s or (0,2000) to prevent the
            show. (1,0) waits on keypress'''
        if show_flag_time[0] == 1:
            cv.imshow('image', pimg)        # cv.imshow(window_name, image)
            cv.waitKey(show_flag_time[1])   # show picture for x ms (x=0 for keypress)
            cv.destroyAllWindows()

    def get_img_reduce_size(l_img_name, max_pixel):
        '''get image and reduce size to max_pixel'''
        mimg = cv.imread(l_img_name)          # read the image
        if DEBUG:
            print('Original image shape: ', mimg.shape)
        row, col = mimg.shape[:2]           # get number of rows (height), columns (width)
        if row >= col and row > max_pixel:  # calculate ratio to reduce image
            ratio = max_pixel/row
        elif col >= row and col > max_pixel:
            ratio = max_pixel/col
        else:
            ratio = 1.0
        mimg = cv.resize(mimg, (0, 0), fx=ratio, fy=ratio)
        mheight, mwidth = mimg.shape[:2]
        if DEBUG:
            print('Reduced image shape: ', mheight, mwidth)
        mgrey_img = cv.cvtColor(mimg, cv.COLOR_BGR2GRAY) # convert to grey image
        return mimg, mgrey_img, mheight, mwidth

    def get_circle_and_crop_image(pimg, red_ratio, minrr, maxrr):
        ''' Reduce image size with red_ratio (needed for second pointer
            Getting circles using HoughCircles. Important for a good result are the
            two last parameter: minRadius and maxRadius! Adjust to your image. '''
        mheight, mwidth = pimg.shape[:2]
        new_height = int(mheight*red_ratio)
        new_width = int(mwidth*red_ratio)
        mx1 = (mwidth - new_width)
        my1 = (mheight - new_height)
        mimg = pimg[my1:new_height, mx1:new_width]
        mgrey_img = cv.cvtColor(mimg, cv.COLOR_BGR2GRAY) # convert to grey image
        mgrey_blured_img = cv.medianBlur(mgrey_img, 5)
        mheight, mwidth = mgrey_blured_img.shape[:2]
        circles = cv.HoughCircles(mgrey_blured_img, cv.HOUGH_GRADIENT, 1, 20, np.array([]), 100, 50,
                                  int(mheight*minrr/2), int(mheight*maxrr/2))
        b = circles.shape[1]
        if DEBUG:
            print('Number of circles: ', b)
        mcircles_img = mimg.copy()
        mcircle_img = mimg.copy()
        for (mx, my, mr) in circles[0, :]:
            cv.circle(mcircles_img, (int(mx), int(my)), int(mr), (0, 255, 0), 3)
            cv.circle(mcircles_img, (int(mx), int(my)), 2, (0, 255, 0), 3)
        mx, my, mr = avg_circles(circles, b) # averaging out nearby circles
        cv.circle(mcircle_img, (mx, my), mr, (0, 255, 0), 3)
        cv.circle(mcircle_img, (mx, my), 2, (0, 255, 0), 3)
        rect_x = (mx - mr)                  # crop image to circle (x=r, y=r)
        rect_y = (my - mr)
        cropped_img = mimg[rect_y:(rect_y+2*mr), rect_x:(rect_x+2*mr)]
        cropped_circle_img = mcircle_img[rect_y:(rect_y+2*mr), rect_x:(rect_x+2*mr)]
        cropped_grey_img = mgrey_img[rect_y:(rect_y+2*mr), rect_x:(rect_x+2*mr)]
        mheight, mwidth = cropped_circle_img.shape[:2]
        if DEBUG:
            print('Reduced image shape: ', mheight, mwidth)
        return mr, mr, mr, mcircles_img, cropped_img, cropped_circle_img, \
            cropped_grey_img

    def get_pointer(px, py, pimg, pgrey_img, p1_b_low, p1_b_up, p2_b_low, p2_b_up):
        ''' Create a threshhold image to get lines using HoughLinesP. '''
        THRESH = 100                        # test which threshhold function performs best
        MAX_VALUE = 180
        MIN_LINE_LENGTH = 100
        MAX_LINE_GAP = 10
        mgrey_img = cv.medianBlur(pgrey_img, 5)
        threshhold_img = cv.threshold(mgrey_img, THRESH, MAX_VALUE, cv.THRESH_BINARY_INV)[1]
        lines = cv.HoughLinesP(image=threshhold_img, rho=3, theta=np.pi / 180, threshold=100,
                               minLineLength=MIN_LINE_LENGTH, maxLineGap=MAX_LINE_GAP)
        mlines_img = pimg.copy()
        mline_img = pimg.copy()
        for line in lines:                  # create image with lines
            mx1, my1, mx2, my2 = line[0]
            cv.line(mlines_img, (mx1, my1), (mx2, my2), (0, 255, 0), 2)
        p1_b_low = 0                        # how close the line (P1) should be from the center
        p1_b_up = 0.3
        p2_b_low = 0.7                      # how close P2 should be to the outside of the gauge
        p2_b_up = 0.9
        mx1, my1, mx2, my2 = calculate_pointer(px, py, lines, p1_b_low, p1_b_up,
                                               p2_b_low, p2_b_up)
        cv.line(mline_img, (mx1, my1), (mx2, my2), (0, 255, 0), 2) # create image w line
        return mx1, my1, mx2, my2, threshhold_img, mlines_img, mline_img

    def calculate_pointer(px, py, plines, p1_b_low, p1_b_up, p2_b_low, p2_b_up):
        '''calculate the pointer'''
        final_line_list = []
        for i, pline in enumerate(plines):
            for mx1, my1, mx2, my2 in pline:
                diff1 = dist_2_pts(px, py, mx1, my1)  # x, y is center of circle
                diff2 = dist_2_pts(px, py, mx2, my2)  # x, y is center of circle
                if diff1 > diff2:             # set diff1 to be the smaller (closest to center)
                    diff1, diff2 = diff2, diff1  # of the two,makes the math easier
                if (p1_b_low*r < diff1 < p1_b_up*r) and \
                   (p2_b_low*r < diff2 < p2_b_up*r): # check if in acceptable range
                    final_line_list.append([mx1, my1, mx2, my2]) # add to final list
        try:
            mx1 = final_line_list[0][0]
            my1 = final_line_list[0][1]
            mx2 = final_line_list[0][2]
            my2 = final_line_list[0][3]
        except IndexError:
            print("\nWrong matching line found? recheck this part of code!\n")
        return mx1, my1, mx2, my2

    def get_red(pimg):
        '''filter the red channel'''
        img_hsv = cv.cvtColor(pimg, cv.COLOR_BGR2HSV)
        red_min = np.array([0, 60, 0])
        red_max = np.array([10, 255, 255])
        mask = cv.inRange(img_hsv, red_min, red_max)
        return ~mask                          # return inverted image

    def calculate_angle_and_value(px, py, px1, py1, px2, py2):
        '''calculate the angle and value'''
        dist_pt0 = dist_2_pts(px, py, px1, py1)
        dist_pt1 = dist_2_pts(px, py, px2, py2)
        if dist_pt0 > dist_pt1:
            xlen = px1 - px
            ylen = py - py1
        else:
            xlen = px2 - px
            ylen = py - py2
        if xlen == 0:
            xlen = 0.0000000000000000001
        res = np.arctan(np.divide(float(abs(ylen)), float(abs(xlen)))) # arc-tan
        res = np.rad2deg(res)
        if DEBUG:
            print("res", res)
            print("xlen, ylen", xlen, ylen)
        if xlen < 0 and ylen > 0:             # quadrant 4
            final_angle = res + 270
        if xlen > 0 and ylen > 0:             # quadrant 1
            final_angle = 90 - res
        if xlen > 0 and ylen < 0:             # quadrant 2
            final_angle = 90 + res
        if xlen < 0 and ylen < 0:             # quadrant 3
            final_angle = 270 - res
        value = final_angle/360*100
        return final_angle, value

    # flags and times in ms to show images
    flag = {"reduced":(0, 500), "grey":(0, 500), "circles":(0, 500),
            "circle":(0, 500), "threshhold":(0, 500), "lines":(0, 500),
            "line":(1, 500), "circles_2":(0, 500), "circle_2":(0, 1500),
            "grey_2":(0, 5000), "threshhold_2":(0, 200), "lines_2":(0, 500),
            "line_2":(1, 500)}

    os.chdir(DIR_NAME_IMAGES)                 # change directory
    img_list = glob.glob('*.jpg')             # get list with jpg images
    img_list.extend(glob.glob('*.png'))       # and png images
    img_list.sort()
    if img_list == []:
        print("error: no images!")
    data_saved = dict.fromkeys(img_list, 0)   # create directory from list
    print(data_saved)

    for img_name in img_list:
        print(img_name, end='')
        img, grey_img, height, width = get_img_reduce_size(img_name, MAX_PIXEL)
        show_image(img, flag["reduced"])
        x, y, r, circles_img, img, circle_img, grey_img = \
            get_circle_and_crop_image(img, 1, MIN_RADIUS_RATIO_1,
                                      MAX_RADIUS_RATIO_1)
        show_image(grey_img, flag["grey"])
        show_image(circles_img, flag["circles"])
        show_image(circle_img, flag["circle"])
        x1, y1, x2, y2, threshhold_image, lines_img, line_img = \
            get_pointer(r, r, circle_img, grey_img, L1_P1_LOW, L1_P1_UP, L1_P2_LOW,
                        L1_P2_UP)
        show_image(threshhold_image, flag["threshhold"])
        show_image(lines_img, flag["lines"])
        show_image(line_img, flag["line"])
        # cv.imwrite("first_pointer.jpg",line_img)
        final_angle_1, value_1 = calculate_angle_and_value(x, y, x1, y1, x2, y2)
        x, y, r, circles_img, img, circle_img, grey_img = \
            get_circle_and_crop_image(img, 0.77, MIN_RADIUS_RATIO_2,
                                      MAX_RADIUS_RATIO_2)
        show_image(circles_img, flag["circles_2"])
        show_image(circle_img, flag["circle_2"])
        grey_img = get_red(circle_img)        # to eliminate black pointer
        show_image(grey_img, flag["grey_2"])
        show_image(grey_img, flag["circle_2"])
        x1, y1, x2, y2, threshhold_image, lines_img, line_img = \
            get_pointer(r, r, img, grey_img, L2_P1_LOW, L2_P1_UP, L2_P2_LOW,
                        L2_P2_UP)
        show_image(threshhold_image, flag["threshhold_2"])
        show_image(lines_img, flag["lines_2"])
        show_image(line_img, flag["line_2"])
        # cv.imwrite("second_pointer.jpg",line_img)
        final_angle_2, value_2 = calculate_angle_and_value(x, y, x1, y1, x2, y2)
        if DEBUG:
            print(final_angle_1, value_1)
            print(final_angle_2, value_2)
        result = round((int(value_2/2) + value_1/100)*10, 4)
        print("\tWe are reading: ", result, "µm\n")
        data_saved[img_name] = result

    if DEBUG:
        print(data_saved)
    df = pd.DataFrame(data_saved, index=[0])  # pandas dataframe
    df.to_csv("my_data.csv", index=False)     # save data to csv file
Downloads
Interesting links:
